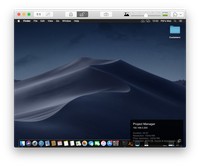
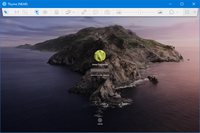
Viewer window reference
The Viewer window is the same for both controlling and observing a server. The only difference is the state of the Control or Observe toggle button. On NEAR and Apple Screen Sharing connections, you can disable controlling the remote computer by selecting Observe.
The window is resizeable, like a usual application window.
| Icon | Description |
|---|---|
Actual size Click to scale the remote computer’s desktop so that every pixel of the remote desktop corresponds to one pixel on the viewer screen. | |
Zoom to fit Click to scale the remote computer desktop to fit the viewer window. | |
Lock and Unlock screen Click the Lock button to show a placeholder on the remote computer’s display so that the remote user couldn’t see what you are doing. Works only in NEAR or Apple Screen Sharing connections to a Mac. | |
Take screenshot Click to save the remote server’s screen image to a local file. | |
Select display Choose which of the remote computer displays you’d like to be shown or the desired resolution of any of them. Appears in Apple Screen Sharing connections to a Mac and NEAR connections to any OS. | |
Desktop Scale Changes the remote computer GUI scale from 100% to 200% on RDP connections. ‘Auto’ means that the remote desktop’s current value will be used. | |
Image quality Adjusts the remote screen image quality from black and white to the highest possible on Apple Screen Sharing connections. | |
Bits per pixel Adjusts the screen color depth from 8 to 32 bits per pixel on non-Mac VNC connections. | |
NEAR image quality Adjusts the quality/performance ratio on NEAR connections. The left side of the slider (Smooth) prioritizes performance over image quality, the right one (Sharp) means the best quality of remote desktop screen but probably worse performance. | |
Send Ctrl+Alt+Del Sends a Ctrl + Alt + Delete sequence to the remote OS. Available only when connected to computers running Windows or Linux. | |
File Transfer Opens the File Manager window that allows you to exchange files between remote and local computers. Appears on NEAR connections only. | |
 | Pin toolbar (Windows only) Turns off automatic hiding of viewer toolbar. |
 | Full screen (Windows only) Click to switch to the full screen mode and scale the remote computer to completely fill your local screen. |
 | Close (Windows only) Click to close the Viewer window and end the remote control session. |
Depending on connection type, some options might appear in the Other section marked with a puzzle icon.
| Option | Description |
|---|---|
Start Recording... / Stop Recording | Available on NEAR connections only Starts or stops recording the current remote control session. See Recording sessions. |
Clipboard Auto Sync | Available on NEAR and Screen Sharing connections When this option is on, Remotix will automatically synchronize your local clipboard and the clipboard of the remote computer. |
Send Clipboard Get Clipboard | Click Send Clipboard is to replace the remote computer clipboard contents with the contents of the local clipboard. |
Smart keyboard / Raw keys / Raw keys with all shortcuts | Choose between keyboard input modes for the current connection. Smart means that Remotix transmits Unicode codes of the locally typed symbols to the remote computer while Raw uses the raw codes of the keyboard buttons you press. |
Keyboard focus on mouse hover | When turned on, Remotix only captures the keyboard input while your local mouse cursor is placed over the Remotix Viewer window. When disabled, Remotix captures your keyboard whenever its window is active. |
Send Force Quit | Available when connected to macOS Click to ask remote macOS to show the Force Quit Applications window. |
Reports | Appears only for Remotix Cloud connections Clicking Reports opens a new tab with collected information about the computer you are connected to. The page is similar to Reports section of Remotix Cloud Hub. |
Logout | Appears only for Remotix Cloud connections Opens a new tab with commands to manage the remote computer where you can log out the selected user. Click the action row to choose which user will be logged out. |
Reboot | Appears only for Remotix Cloud connections Opens a new tab with commands to manage the remote computer where you can make it to reboot. Click the action row to choose if the remote user will be allowed to save changes or cancel restart or not. |
Sleep | Appears only for Remotix Cloud connections Opens a new tab with commands to manage the remote computer where you can put the remote computer to sleep. |
Shutdown | Appears only for Remotix Cloud connections Opens a new tab with commands to manage the remote computer where you can make it to shut down. Click the action row to choose if the remote user will be allowed to save changes or cancel shutdown. |
Empty Trash | Appears only for Remotix Cloud connections Opens a new tab with commands to manage the remote computer where you can choose to empty trash for all users on the target computer. |
Show Connection Info / Hide Connection Info | When Show Connection Info is selected, a small information panel will appear over the remote desktop screen, showing the most essential information about current connection. |
Remote Sound | Available on NEAR connections only Enables Remotix to redirect the sound from the remote computer to the local one. See Remote sound in NEAR. |
Local Cursor | Choose whether to show a local mouse pointer over a remote machine screen. You may want to turn this off e.g. when connected to some older versions of macOS that render the remote pointer into the remote desktop image to avoid seeing two pointers at once. |
Don’t Hide Cursor | Choose whether to ignore the remote OS instruction to hide mouse pointer. This comes useful on Windows connections if there is no physical mouse connected remotely so the remote Windows forces the pointer to hide. |
Show Main Window | Click to show the Remotix main window (the computer list) in case you miss it. |
RELATED INFORMATION
Control or observe a single server

